
In Rachel Denbow's gorgeous, inspiring book DIY Woven Art she walks you through the steps to build several homemade looms and provides tons of DIY wall hanging inspiration. But, best of all, she teaches you basic skills that you can then explore on your own. Here are a few excerpts from the book, describing some of the skills you'll learn in DIY Woven Art. Get inspired!
Basic DIY Wall Hanging Techniques
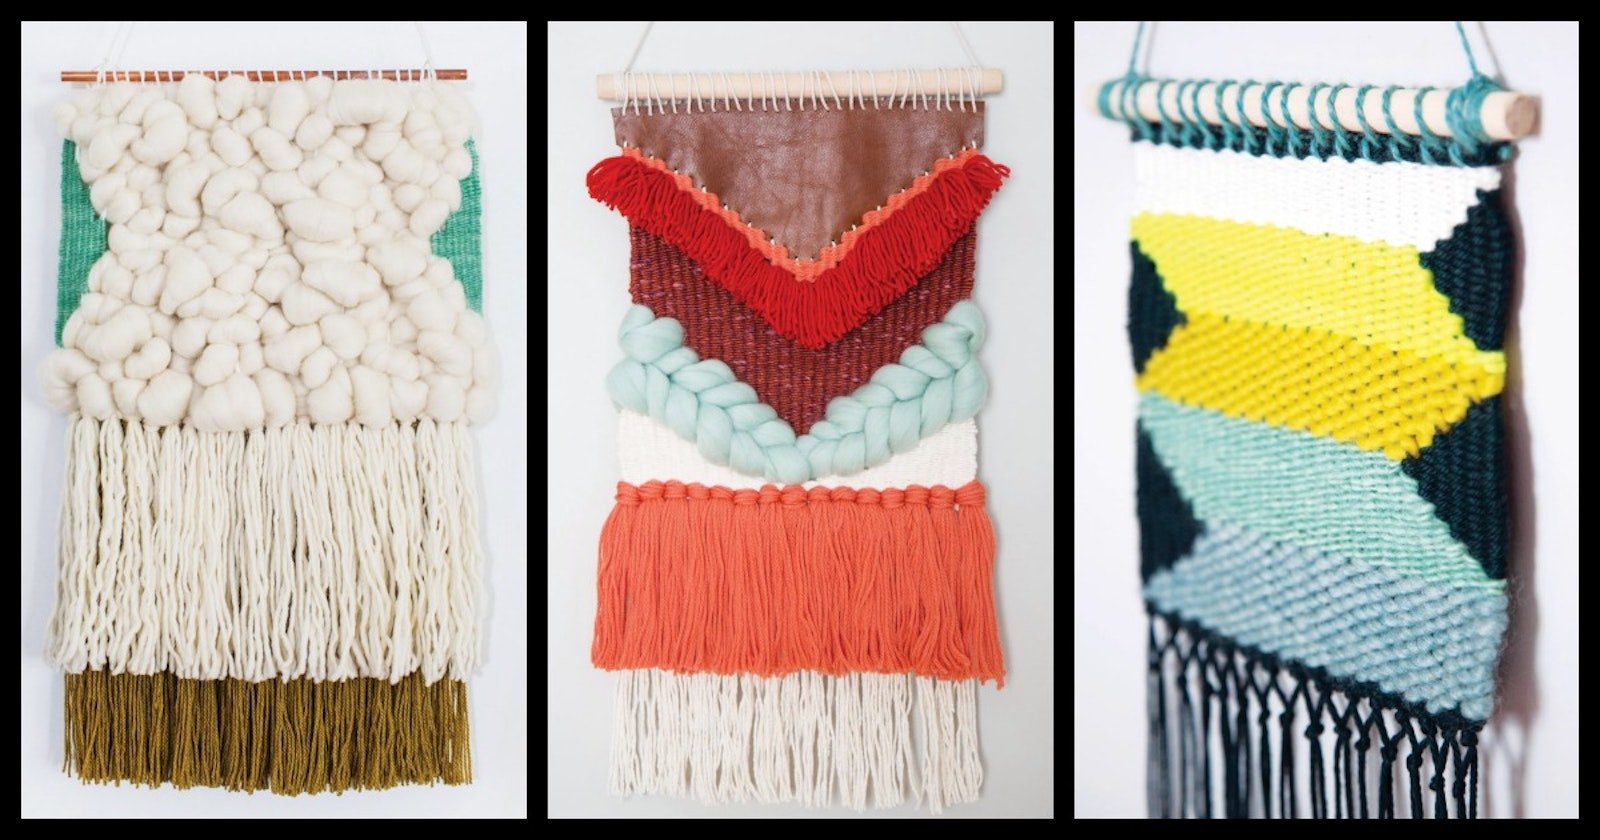
 Just by increasing and decreasing the number of warps you weave across, you can create a wide variety of shapes. All photography by Rachel Denbow and Janae Hardy.
Create Shapes by Increasing and Decreasing Warps
“Learning how to create shapes by decreasing and increasing warps is the next step in laying a solid foundation for your weaving designs. Understanding this technique will make your wall hangings much more interesting as you figure out how to use it to execute all of those designs you’ve been itching to create!”
- Angles
- Vs and Triangles
- Even circles!

This tapestry uses layers upon layers of rya knots to create varied fringe. Learn rya knots and other basic techniques in DIY Woven Art!
Rya Knots
“Fringe can be made up of rya knots, a Scandinavian word describing the traditional rugs made using the type of knot that creates a double-sided pile of yarn. These can be cut to your desired length and made with a variety of thicknesses for different effects. They add a lot of color to each wall hanging and create depth and interest when layered on top of each other or over sections of plain weave.”

Here’s just one way to use roving in your woven tapestries.
Weave with Roving
“Weaving with roving not only makes quick work of things, but it’s also a unique experience. Wool roving is wool that has been cut and carded in preparation to be spun into yarn. It comes in long sections that are usually 2"–3" (5–7.5 cm) thick and can be used for felting as well as weaving. It’s so soft you’ll literally want to curl up and fall asleep in it.
This woven piece (right) uses an undyed bundle of roving, but you can find it in a variety of your favorite colors or experiment with dyeing it yourself. Wool roving will add a great deal of texture and depth to your wall hangings. Use it in small sections to help break up the composition of your piece or fill your entire warp. It can be used in place of spun yarn for a fringe or can add plenty of drama when stitched directly on top of plain weave.”

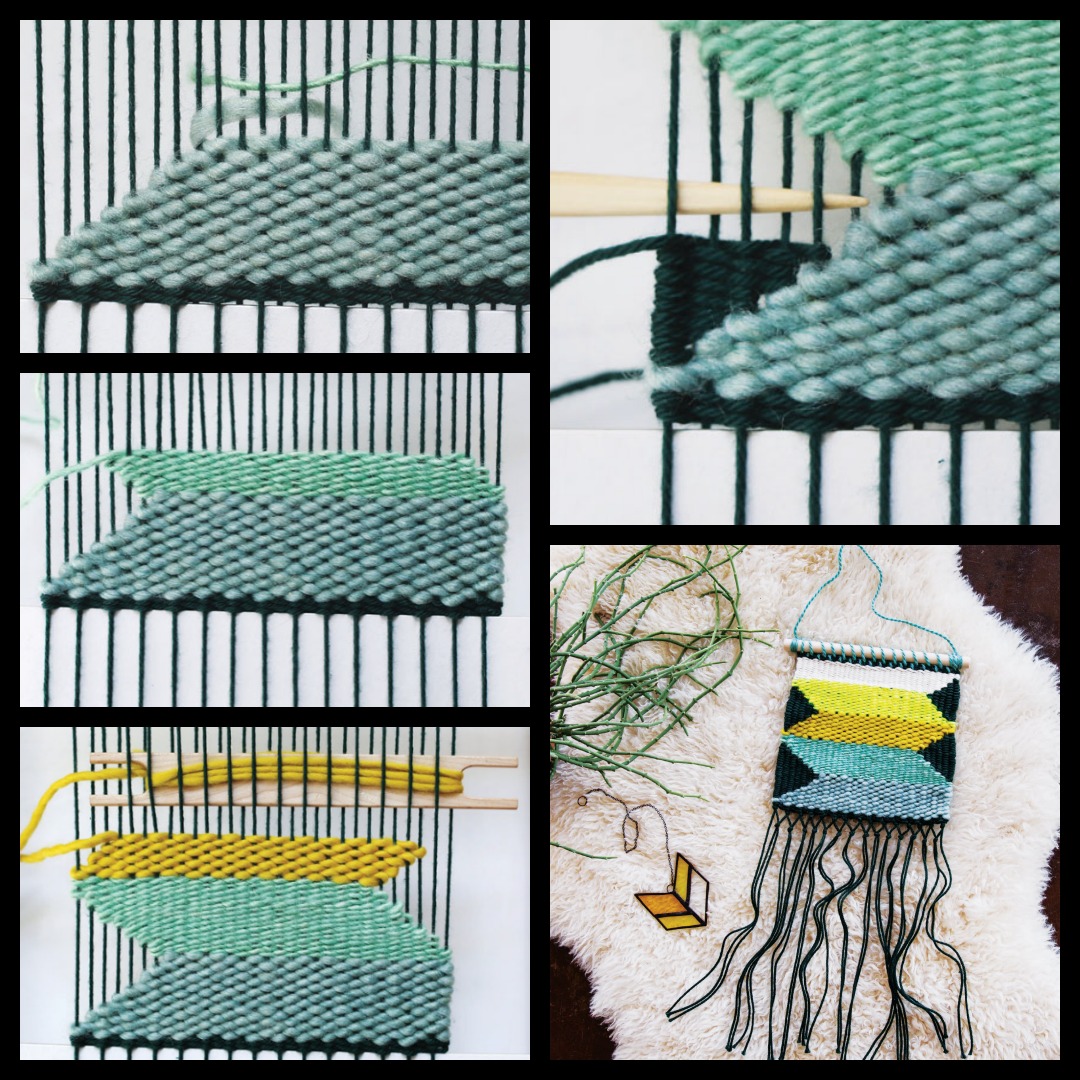
Looping adds wonderful dimension and texture to your hangings.
Looping
"You can create loops using more than one strand of yarn for an even thicker patch, and you can adjust how high they loop depending on the thickness of your dowel or similar tool."
 The soumak stitch can be used to fill in large portions of your
wall hanging or just add variety in small portions.
Soumak Stitch
"The soumak stitch can be used to fill in large portions of your wall hanging or just add variety in small portions. Be aware that it will require more yarn per inch (centimeter) than usual, as you’re traveling back and forth as you work your way in one direction. I like to refer to it as the reverse Bruce Springsteen stitch because you take two steps forward and one step back instead of the way The Boss wrote it."
 Preserving negative space in your DIY wall hangings is a great way to add interest.
Leave Negative Space
"The key to working with negative space is to provide enough structure around your negative space for your warps to stay in place. You can do this by wrapping warps with a weft yarn to define a boundary, working with thinner fibers to create a dense block of weft around your negative space, and keeping enough weight in the spaces below your negative space to keep your warp taut. There’s so much to learn by experimenting with negative spaces in your design."
 These DIY wall hanging projects make use of fabric yarn, feathers, leather, copper pipe, and a raffia-like yarn that’s strong enough to stand up to weaving. Experiment to find your own materials that bring your projects to life!
Play with Unconventional Materials
"Get experimental and look outside the box when it comes to what you use to weave."
- Feathers
- Leather
- Dried Flowers
- Copper Pipe
- Raffia
- Fabric Yarn
The possibilities are endless once you master the techniques Rachel lays out in DIY Woven Art.
Yours in stitches, Andrea
Originally published Feb 28, 2019; updated June 4, 2024