Subscriber Exclusive
Discover a New World of Design with Inlay
Add shapes, pops of color or texture, or areas of complex patterning just about anywhere in your weaving using inlay.
Add shapes, pops of color or texture, or areas of complex patterning just about anywhere in your weaving using inlay. <a href="https://littlelooms.com/stripes-and-blocks-kitchen-towels/">Continue reading.</a>
https://littlelooms.com/cdn-cgi/image/format=auto/https://www.datocms-assets.com/70931/1772669504-horton-stripes-and-blocks-stairs-inlay.jpg?auto=format&w=900
Learn how to easily add extra pops of color and texture anywhere in your weaving with inlay. Photo by Joe Coca
What if I told you there was an easy technique that not only lets you add visual interest in your rigid-heddle weaving, but also gives you complete control of the size, shape, and location? It’s true—but for some reason, this technique is also one I don’t see used nearly as often as I’d like. I’m talking about inlay.
How Inlay Works
So how is it that you can add in bits of design anywhere in your weaving with inlay? Let’s talk about different types of wefts! When we think about how the weft works in weaving, we think of it as stabilizing the warp—it’s what locks the warp into place to create cloth. However, some weave structures and techniques use two types of weft:
- A ground or tabby weft to lock the warp in place and give the cloth stability.
- A pattern or supplemental weft to add areas of patterning that are not needed for the structure of the cloth.
Most weave structures that use pattern wefts, such as overshot, have them go from selvedge to selvedge. Inlay, on the other hand, lets you put bits of pattern weft anywhere.
 Michele Marshall used inlay to add small areas of overshot to her otherwise plain-weave scarf. Photo by Matt Graves
Designing with Inlay
With inlay, you can open up a whole new world of design options. Using inlay can be as simple as cutting small bits of a textured yarn and adding them into a plain-weave shed alongside your regular weft, or it can be as complex as needle weaving areas of overshot between picks of plain weave. You can follow a pattern for your inlay or weave it in a freeform manner.
SUBSCRIBER EXCLUSIVE
Unlock the Full Article with a Little Looms Subscription
Get instant access to this article and the entire Little Looms library of weaving projects, techniques, and expert instruction. With your subscription, you'll receive:
Step-by-step project guides
Skill-building tutorials and design inspiration
Access to premium weaving content, updated regularly
Little Looms Magazine
Easy Weaving with Little Looms offers education and inspiration for weavers on rigid-heddle, inkle, tapestry, pin looms and more.
Plans start at just $4.99/month. Cancel anytime.
What if I told you there was an easy technique that not only lets you add visual interest in your rigid-heddle weaving, but also gives you complete control of the size, shape, and location? It’s true—but for some reason, this technique is also one I don’t see used nearly as often as I’d like. I’m talking about inlay.
How Inlay Works
So how is it that you can add in bits of design anywhere in your weaving with inlay? Let’s talk about different types of wefts! When we think about how the weft works in weaving, we think of it as stabilizing the warp—it’s what locks the warp into place to create cloth. However, some weave structures and techniques use two types of weft:
- A ground or tabby weft to lock the warp in place and give the cloth stability.
- A pattern or supplemental weft to add areas of patterning that are not needed for the structure of the cloth.
Most weave structures that use pattern wefts, such as overshot, have them go from selvedge to selvedge. Inlay, on the other hand, lets you put bits of pattern weft anywhere.
Michele Marshall used inlay to add small areas of overshot to her otherwise plain-weave scarf. Photo by Matt Graves
Designing with Inlay
With inlay, you can open up a whole new world of design options. Using inlay can be as simple as cutting small bits of a textured yarn and adding them into a plain-weave shed alongside your regular weft, or it can be as complex as needle weaving areas of overshot between picks of plain weave. You can follow a pattern for your inlay or weave it in a freeform manner.
[PAYWALL]
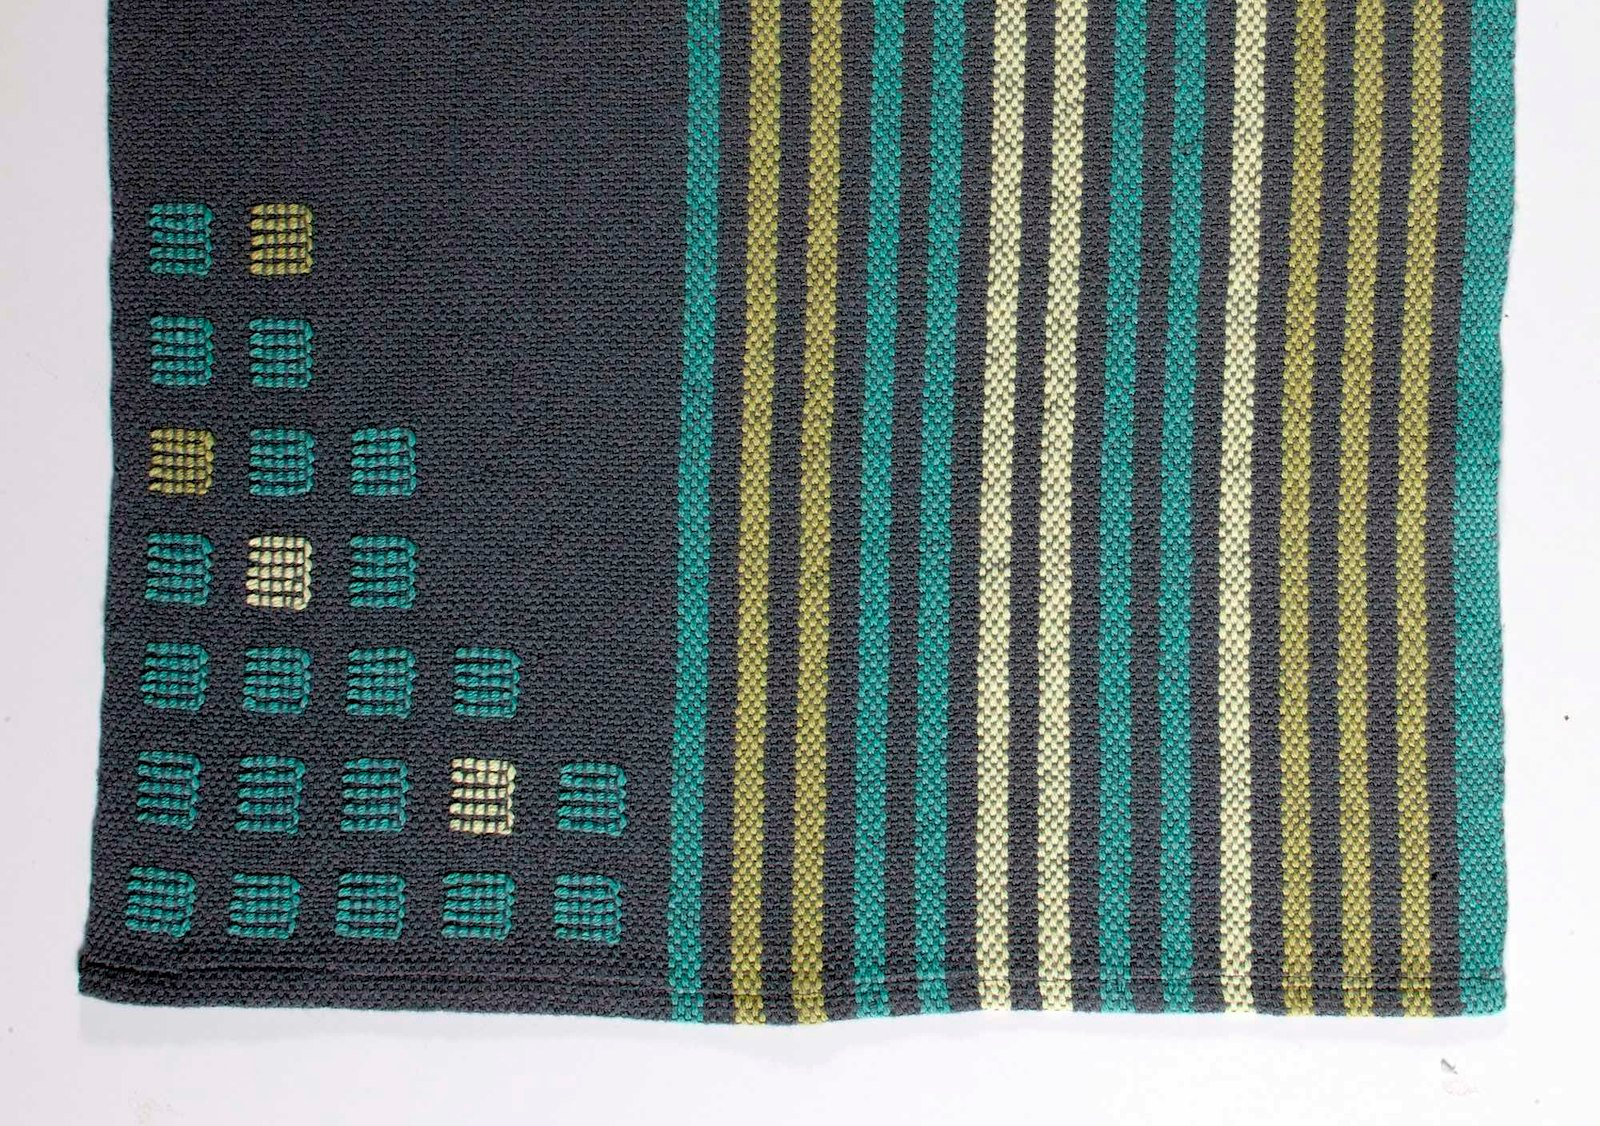
For a fantastic—and beginner-friendly—example of how to use inlay in your weaving, check out Susan E. Horton’s Stripes and Blocks Kitchen Towels. In her design, Susan uses small squares of inlay alongside warp stripes to create modern-looking geometric designs on her towels. On one towel she has the inlay squares create steps; on the other she alternates rows of inlay squares with weft stripes.
 Susan E. Horton’s Stripes and Blocks Kitchen Towels are a great example of how to use inlay as a design element in weaving. Photo by Joe Coca
I love both towels, but the one with the stepped design is my favorite. Instead of making all the squares the same color or making each row or column the same color, Susan chose to make just four seemingly random squares different colors, adding to the playful feel of the piece. It’s such a small thing, but it’s just so good!
Even better, the technique she uses for inlay is super-easy—instead of finger or needle weaving in each inlay pick to create weft floats, she uses a pick-up stick to do the warp manipulation for her.
I would love to see more inlay in Little Looms, so we’ve made the project PDF for the Stripes and Blocks Kitchen free for subscribers. I encourage you to download the project today and give inlay a try!
Happy Weaving!
Christina