
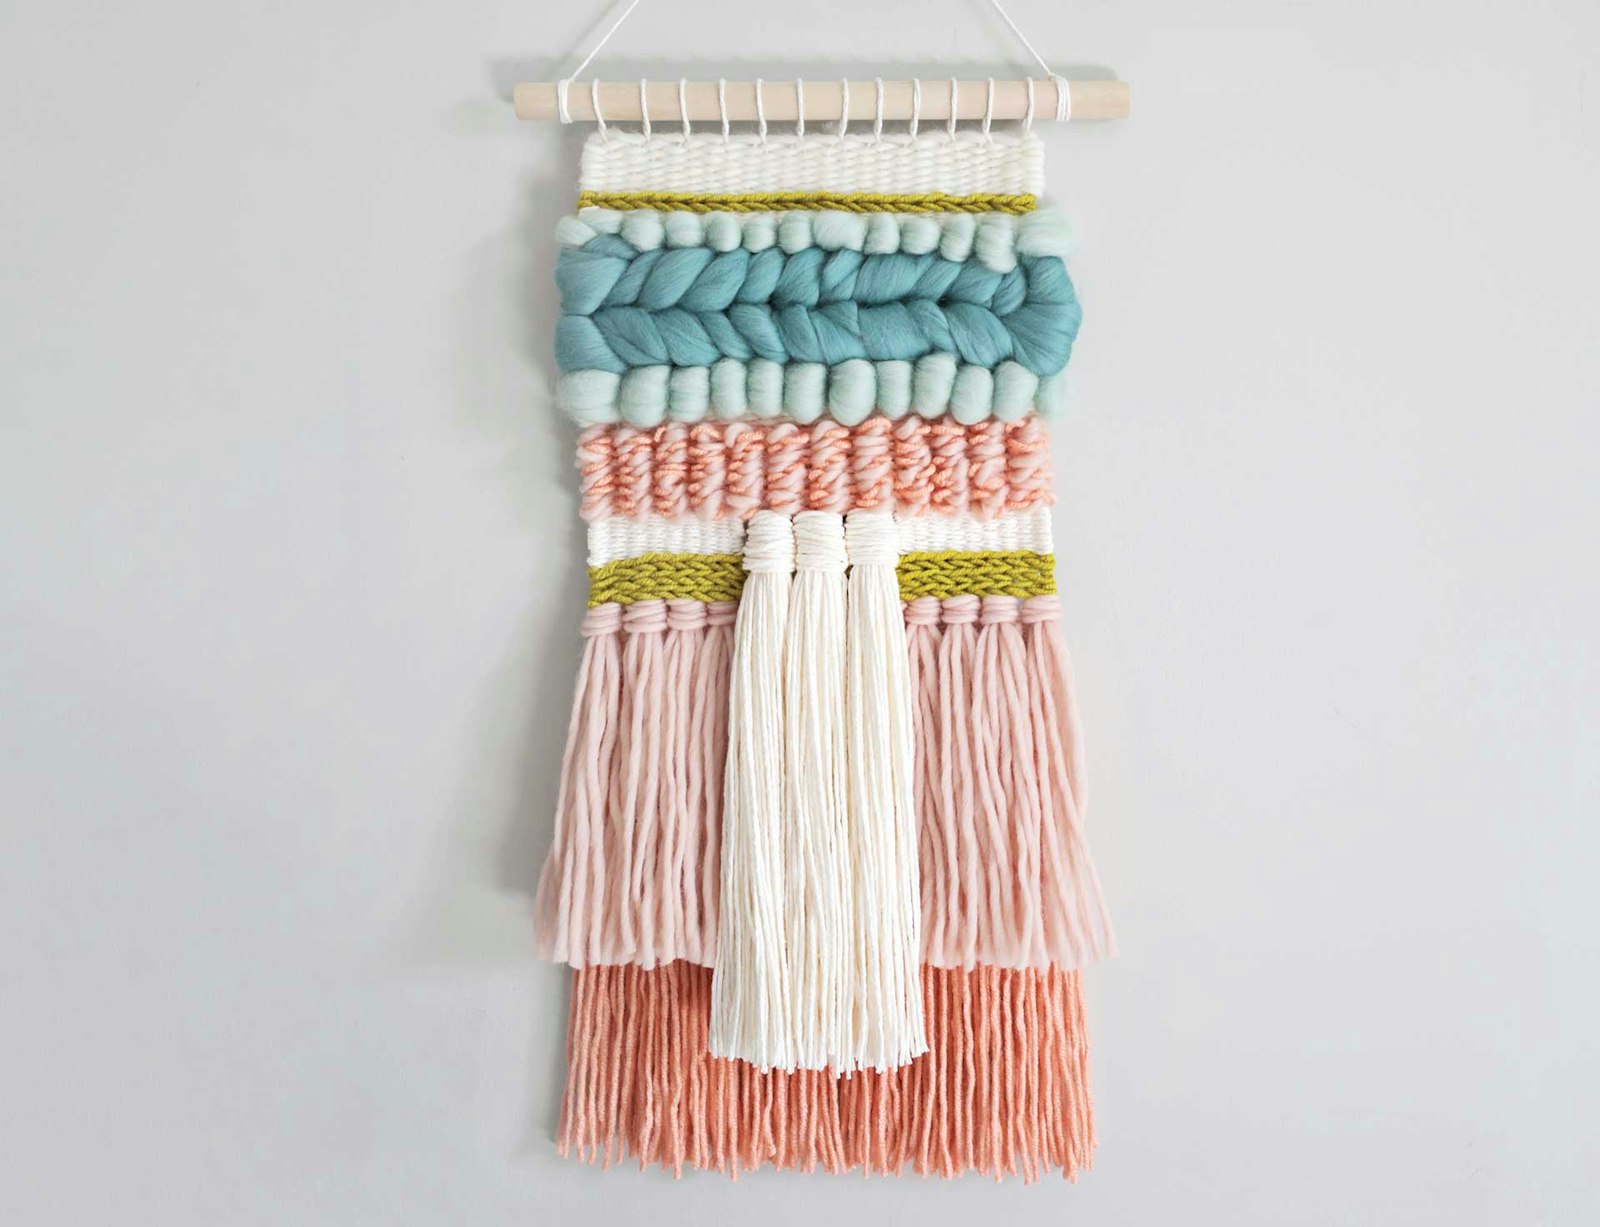
What has offered both beauty and utility to entire cultures for thousands of years and is currently generating sold-out workshops across the world? Your new favorite medium, that’s what! Frame-loom weaving offers the simplicity of a fixed structure that is both portable and versatile. You can create flat tapestries and dimensional wall hangings with lap-sized frame looms (such as the one in this project) or work on a larger frame loom to create items such as rugs, pillows, and statement wall art.
Once you understand the basics of over and under as well as a few of the most useful stitches, you’ll find yourself forever eager to get back in front of your loom to create your next woven piece! I truly believe anyone can learn to weave, and frame-loom weaving requires very little to get you on your way.
Warping Your Loom
Warping a frame loom merely requires tying a loop knot around one of the top pegs and wrapping the warp yarn straight down and around the bottom peg directly below. Continue creating vertical lines by wrapping the warp yarn back up to the top and around the next peg before continuing back down to the bottom peg directly below.
While warping your loom, do your best to keep a steady tension throughout, because a loose or inconsistent warp can affect the structure of your woven piece. Adjust your tension by tightening or loosening the rows until you can evenly push down on the warp threads about ½". Once you’ve reached the desired width, tie another loop knot on top of the loom so that both knots are on the same side (Figure 1). This will officially become the bottom of your wall hanging so that the cleaner loops on the other end of the loom can be on display, so rotate the loom 180°.
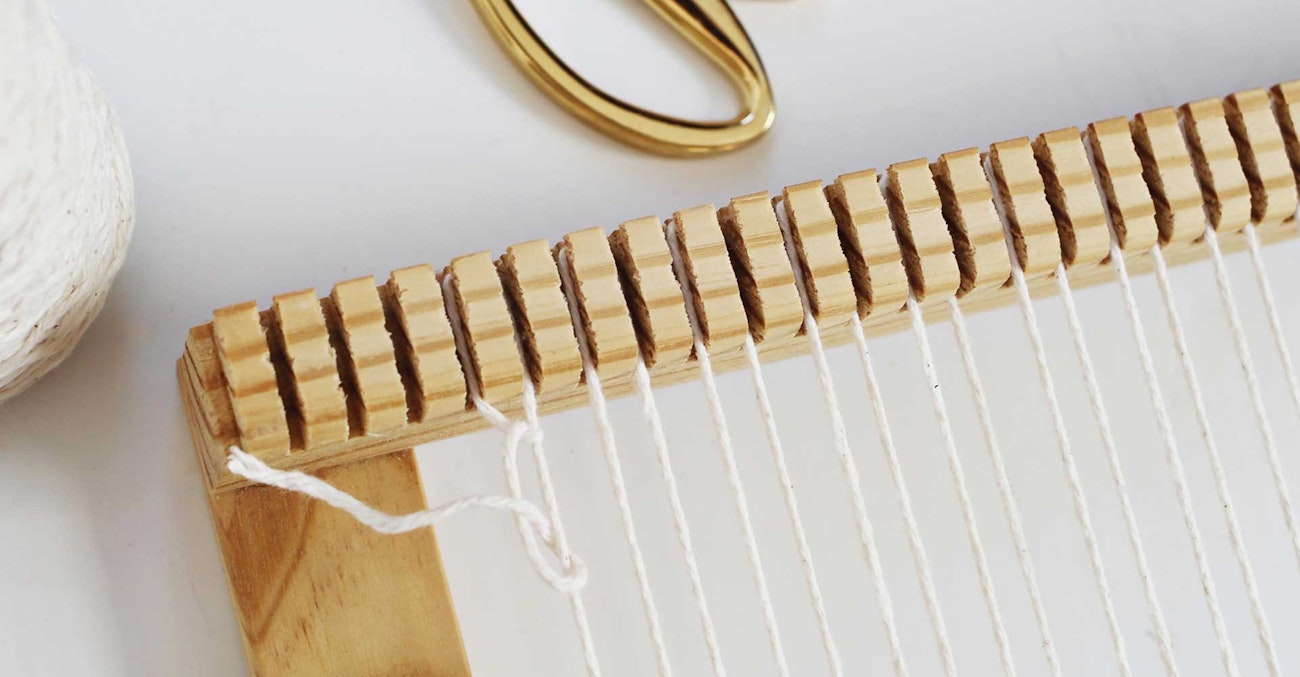
Figure 1
Plain Weave
Cut a 2" x 14" cardboard space holder, weave it through your warp, and slide it to the bottom where the knotted ends are. It will hold enough space for each warp row to be knotted together to support the structure of your weaving. Our next step in creating this woven wall art is to add a few rows of plain weave to act as a woven base before we add rya knot fringe. Using a 3" tapestry needle or a stick shuttle (shown), weave the weft yarn under and over the warp threads opposite the ones you wove your placeholder through. As you pull the weft yarn through, pull it up at a 45° angle and then back down to create a little rainbow. Then gently press the weft yarn down in the center and throughout so that the row resembles a ripple effect (Figure 2). Using your fingers or a weaving comb, press the weft row down so that it’s even and flat against the space holder. Creating this little rainbow and ripple effect allows for just enough slack in each weft row to avoid the dreaded hourglass shape—a result of the outer warp threads, or selvedge edges, being pulled in with each new weft row.
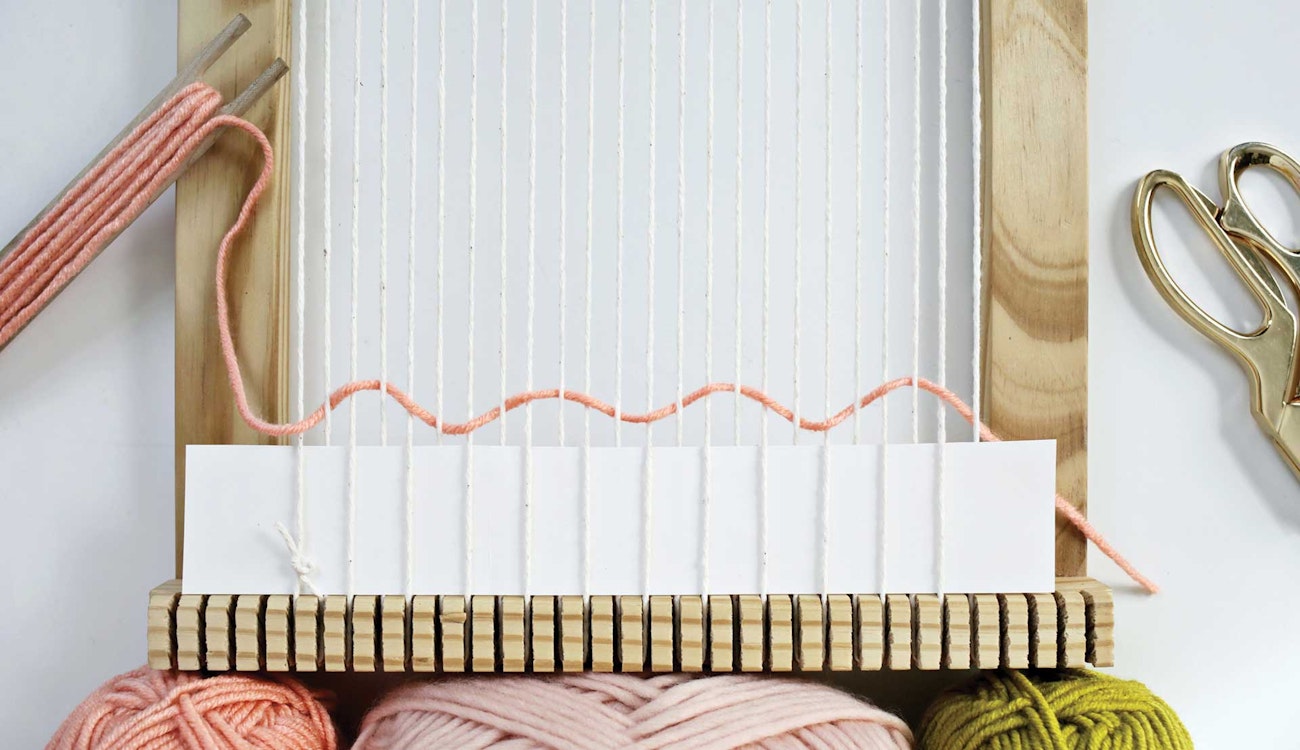
Figure 2
Once your first weft row is flat against the space holder, wrap the yarn around your selvedge edge (the outer warp thread) and weave back to the starting place. If your first weft row went over the warp row, this second weft row should go under it. Just weave the opposite of your previous weft row all the way across, allowing enough slack to create a little rainbow so you don’t pull in at the edges (Figure 3). Push it down with your fingers or a weaving comb so that it’s flush against the previous weft row. Repeat this process until you’ve woven six to eight weft rows of plain weave. Be sure to leave about 4" of yarn tail when you are finished weaving. If you run out of yarn in the middle of a weft row, just tuck it to the back of the weaving. You can add another length of the same yarn or change your color by continuing where you left off, coming up from the back of your weaving with the tapestry needle or stick shuttle. If you end on the selvedge edge, just wrap the end around and tuck it to the back of the weaving between the selvedge edge and the warp row next to it. This will give you a cleaner edge; you can stitch the loose end through the back of the weaving when you’re finished.
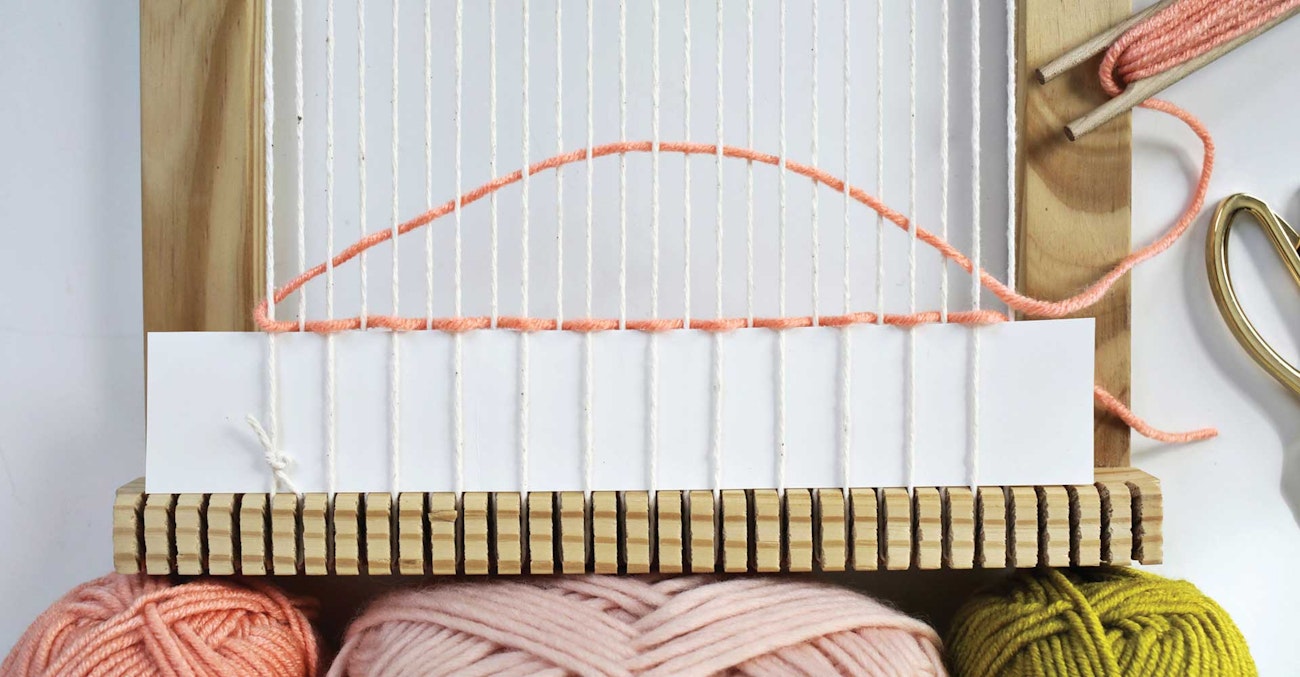
Figure 3
Rya Knots
Create a layer of fringe with long rya knots. Each rya knot will wrap around two warp threads, so count how many warp threads you have and divide by two to know how many rya knots to make. If you want the fringe to be about 12" long, double that length and add 2" to get the length of each strand you’ll cut for each rya knot. You’ll quickly learn how thick you prefer your rya knots to be. Heavier yarns will require fewer strands per rya knot, while laceweight or fingering-weight yarns will require more for the same thickness.
Using a worsted weight-yarn, I chose to incorporate seven strands per rya knot so each of those strands measured 26" long. Once all of the strands are cut, find the center of the yarn length and place it over the top of your two warp threads. Wrap one end of the strands all the way around the left warp and the other end all the way around the right warp (Figure 4). Gently pull the two ends together toward you so that the knot tightens. Adjust the knot so that the strands are mostly flush with each other and then slide the knot down to rest on top of the plain weave. Repeat all the way across to fill the warp with a row of rya knots. You can trim these to have a clean even line once it’s hung.
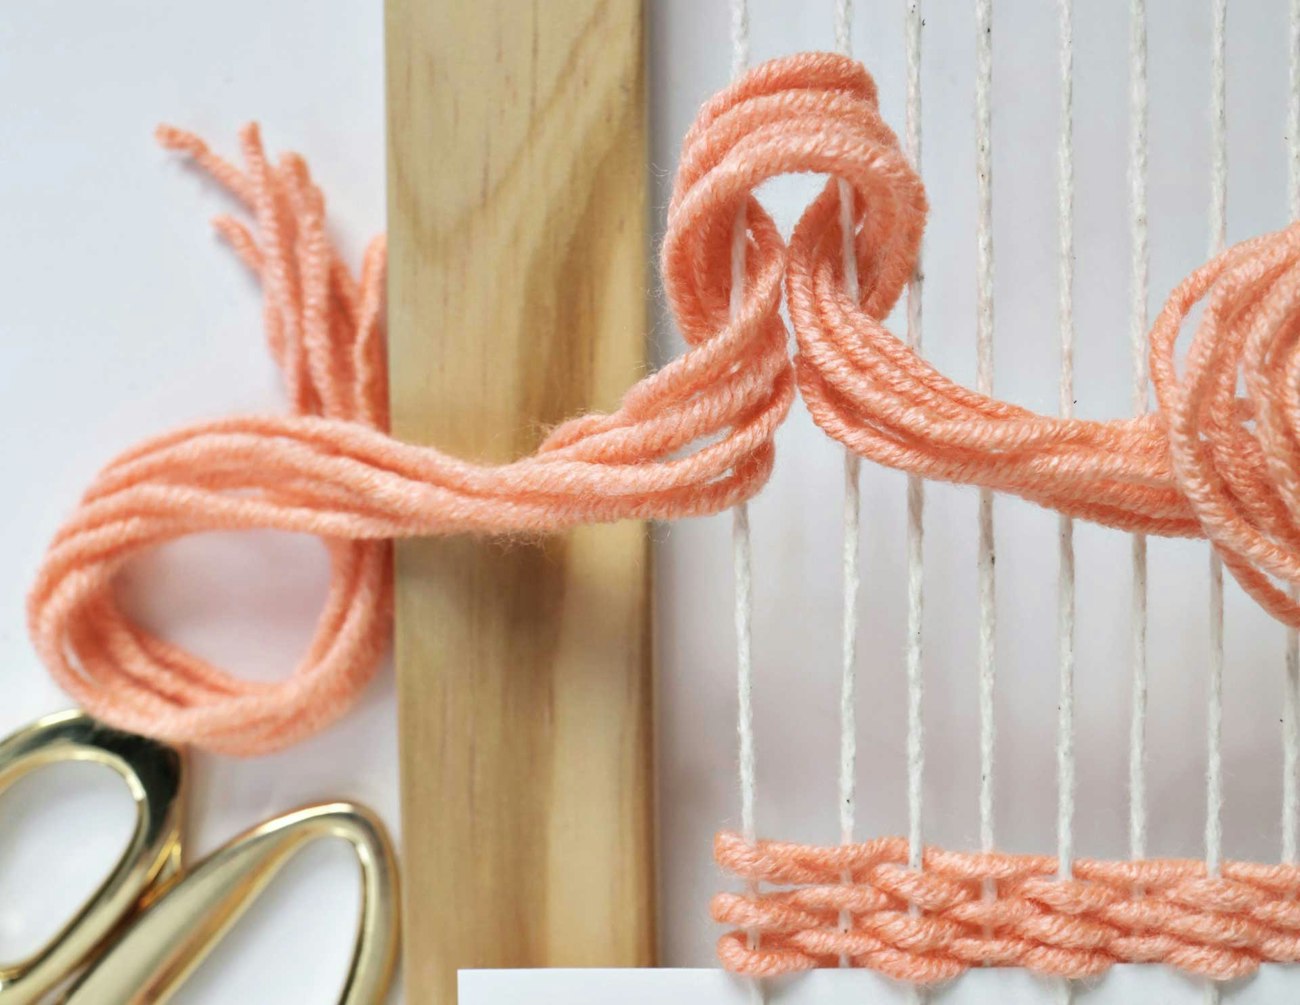
Figure 4
Add another section of plain weave on top of your rya knots to add height to your wall hanging before adding another section of rya knots. This also provides more support to the structure of your weaving. Adding rya knots on top of rya knots can cause your warp threads to pull apart from each other and create slits in your weaving, so it’s best to include at least two rows of plain weave between each section of rya knots.
Soumak
Soumak creates a different pattern than plain weave and can add a lot of interest to your design. A single weft row of soumak creates a slanted pattern. When you add a second row of soumak on top of it in the opposite direction, you’ll get a herringbone effect. Using thicker fibers such as wool roving can achieve a braided effect. To get started, thread a tapestry needle with about 3' of worsted-weight yarn and come up with your needle between the first and second warp threads on the left side. Leave a 4'' tail and wrap the threaded yarn around the first warp so that it comes up between the first and second warp again. This secures the yarn in place so you can start the soumak stitches. Stitch around the second warp thread so that you come back up between the first and second warp again and pull taut. Then stitch all the way around the third warp thread and up between your second and third warp threads (Figure 5). Continue stitching two warp threads forward and one back until you reach the other side. You can adjust this pattern to four forward and two back for a more elongated pattern or four forward and one back when using a bulky fiber such as roving. Weave two rows of plain weave after every two rows of soumak to provide structural support.
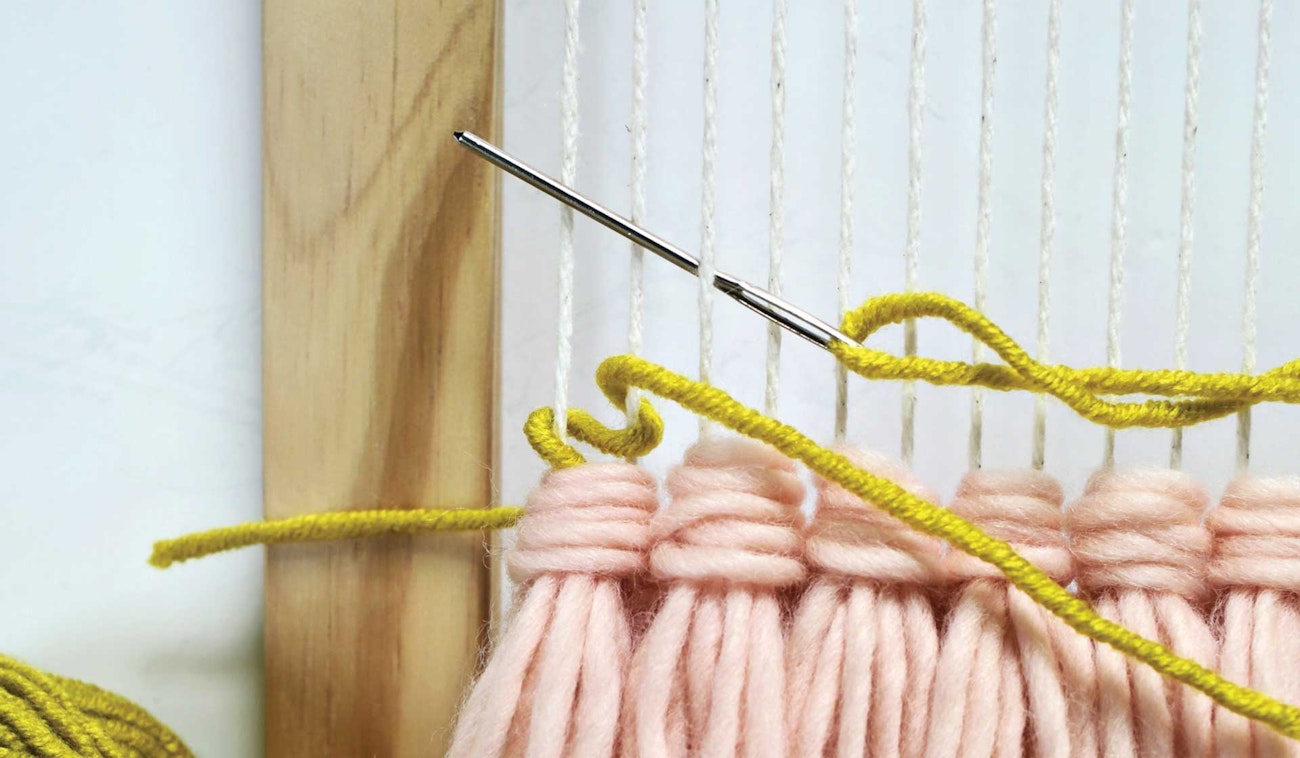
Figure 5
Loop Pile
Incorporating loop pile into your design is another great way to add depth and texture to your wall hanging. You can use one to six strands of yarn at a time for different thicknesses; pair different textures, weights, and colors together; or just keep it simple. Start out your loop pile section with a weft row of plain weave and then weave a loose second weft row. With one hand, pick up the yarn strand(s) where they are woven over a warp thread, and with your other hand, slide a knitting needle or wooden dowel through the loop you just picked up. Continue gently pulling the strands up and stitching through them until you get to the end of the row. Make any adjustments for a consistently looped row and press the knitting needle down so it’s flush against the previous weft row, but don’t remove it yet. Weave a row of plain weave (Figure 6) and push it down so that it’s pressed firmly against the loop pile row. Gently remove the knitting needle or dowel and press the plain-weave row down even more if needed to secure the loop pile row further. Loop pile looks best in sections, so weave another loop pile row and follow it with a row of plain weave to secure it. Repeat until you’re happy with the height of this section and end on a row of plain weave. Experiment with even larger loops by using a thicker dowel or pulling your knitting needle about 1" away from the warp rows to elongate your loops.
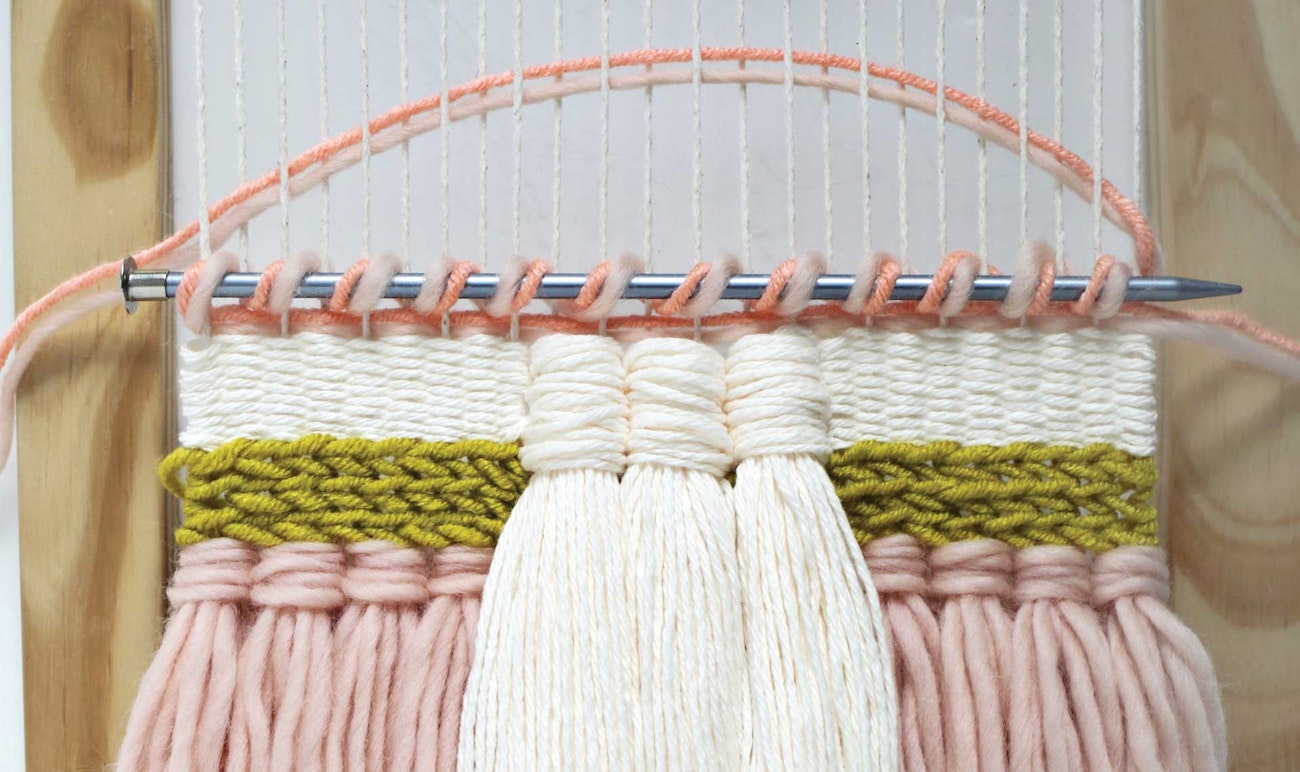
Figure 6
Weaving with Roving
Weaving with roving can be a different animal altogether. Roving is wool fiber that has been processed but not spun into yarn. It adds incredible texture to your design and can be purchased in a variety of beautifully dyed colors. You can weave it in plain weave, create loop piles, weave with a soumak stitch, or even use it to make rya knots! The thicker varieties require a little more patience and finesse as you maneuver them through the warp threads, but the results are always worth it.
Knowing how much roving you’ll need per stitch is important because it is much easier to weave with one length of roving than to use multiple shorter lengths, as overlapping the tail ends can create extra bulk. When creating a loop pile with roving, measure out a little more than twice the width of your warp, depending on how high you want the loop pile. I used a thinner length of mint roving for the loop pile in this design to create a little variety in my pattern, and instead of using a knitting needle, I just gently pulled each section of roving up over a warp thread and held it with one hand while I pulled up on the section next to it. Its extra bulk and texture make it easier to keep in place without needing an extra tool. I just wrapped my tail ends around the selvedge edge so that they were tucked in between other threads for a clean edge. Weaving a soumak stitch will require about three times the length of your warp, since you’re doubling back with so much bulk. When weaving with thicker roving, you will want to increase your soumak stitches to four forward and two back or three forward and one back (Figure 7). This will allow some room for the thicker roving without crowding things and distending your design.
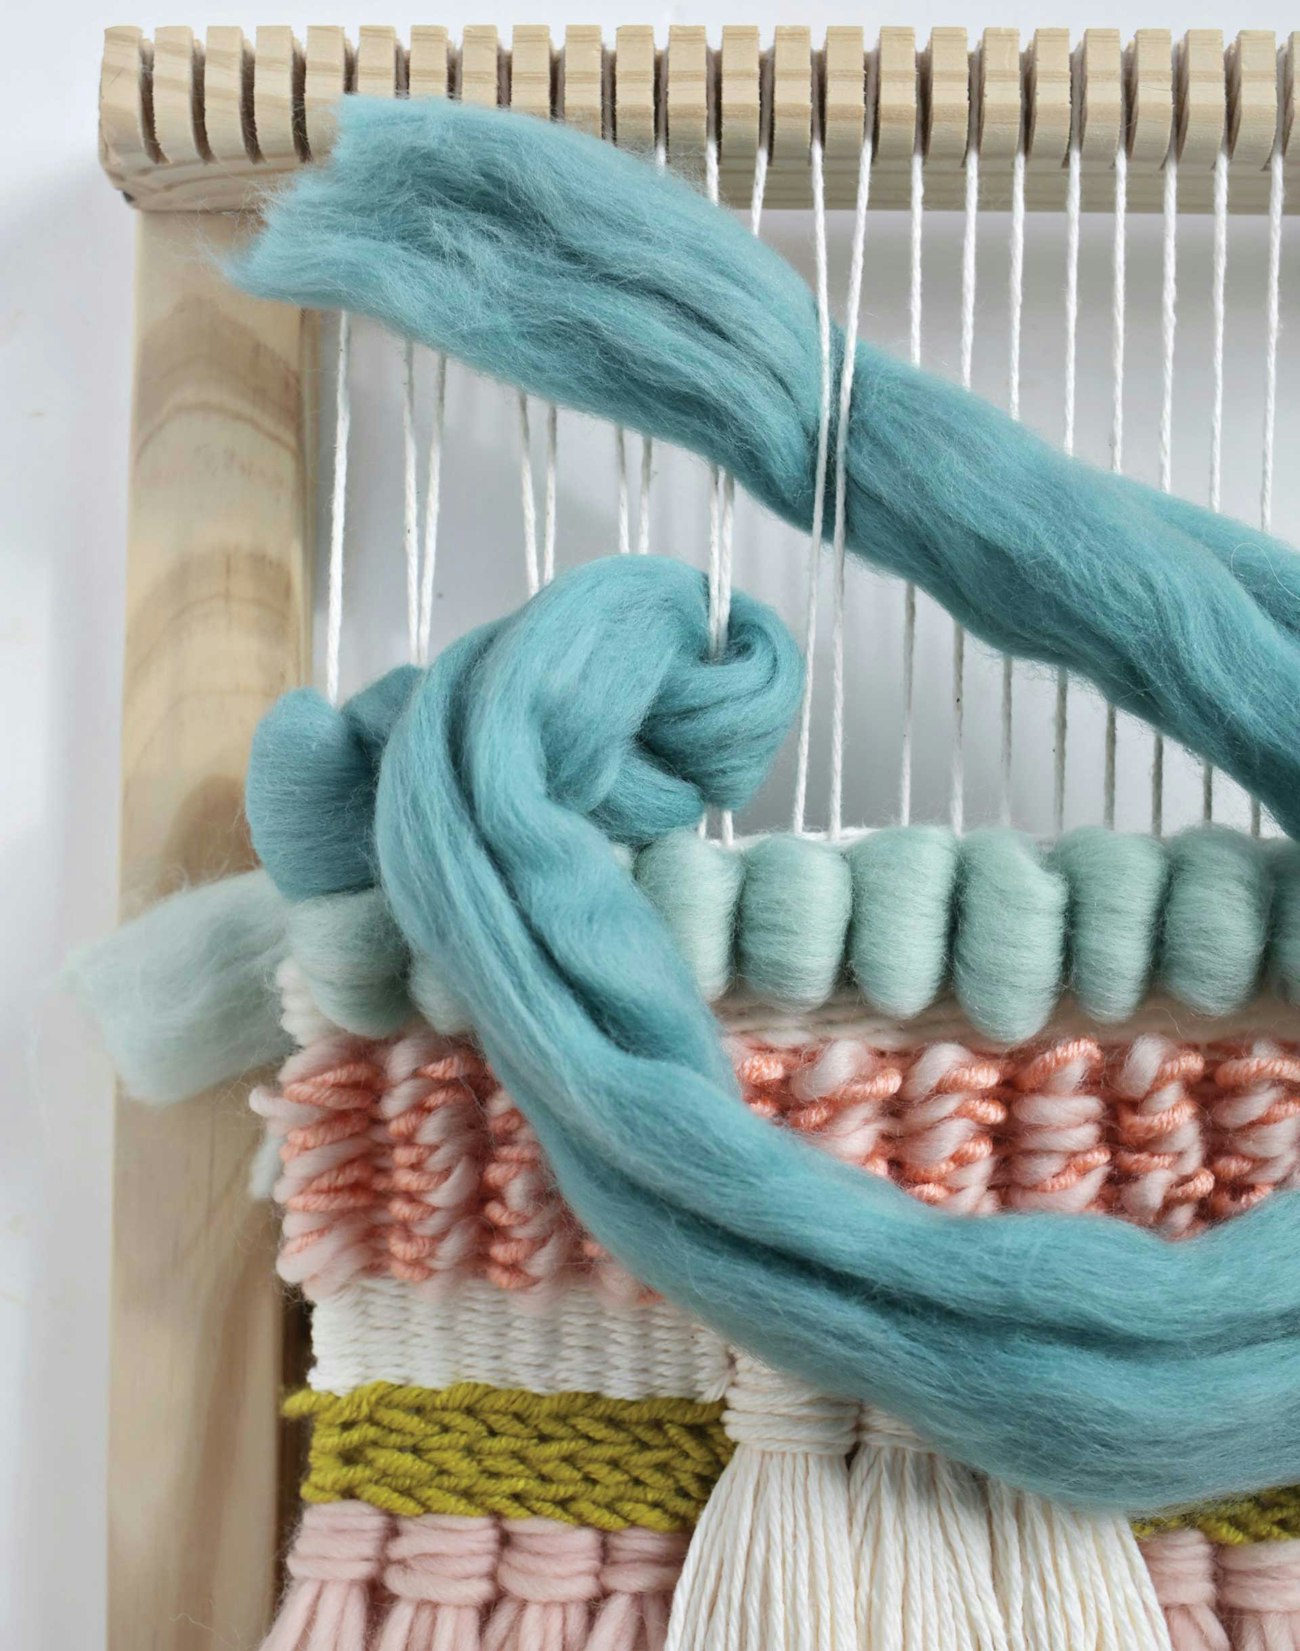
Figure 7
Finishing Up
To complete your wall hanging, weave up to the top of your loom. Remove the warp threads from the pegs or notches and twist them once before threading them over a wooden dowel or copper pipe. This helps lock your last weft row in place and is just one of the few ways you can finish off and hang your wall hanging. Remove the warp threads from the bottom of the loom and carefully remove the cardboard placeholder. Starting with the outer warp thread, tie the warp threads together in pairs with a loop knot resting snugly against the first weft row. Trim the fringe for straight horizontal lines or cut them at an angle for a completely different look.
They say you only need three chords to write a song. It seems you only need three stitches and a knot technique to weave a beautiful wall hanging. The design possibilities are endless when you experiment with your favorite colors, incorporate different textures, and begin to understand all the ways to manipulate each stitch. I imagine you’ll be covering your walls in no time!