

If you’re wanting to go beyond plain weave in your rigid-heddle projects but find pick-up charts confusing or intimidating, don’t worry—we’ve got you covered! As with much in weaving, once you understand the language of pick-up, reading the charts and instructions will be second nature.
First things first, though. Before you pick up any warp ends, put your heddle in the down position. Why? Because in pick-up, you’re picking up only the slot ends. Putting the heddle down pushes down all the hole ends so you don’t have to worry about accidentally picking one up.
How to Read a Pick-up Stick Draft
You’ll find written instructions and a chart for the pick-up stick setup in many drafts. A great way to familiarize yourself with these charts is to try to read them first and then check against the written instructions. To demonstrate we’ll use example drafts from the course Pick-Up Stick Basics and Beyond.
All charts are read from right to left, the same way you place the pick-up stick (starting at the right).
For pick-up stick B in this example, you’ll begin by picking 1 up because that is the number you see first in the right column, then 2 down, followed by 4 up. Then you’ll repeat 2 down, 4 up to the end. The starting or ending outliers that aren’t part of the repeats are a good thing to watch out for and make sure you utilize.
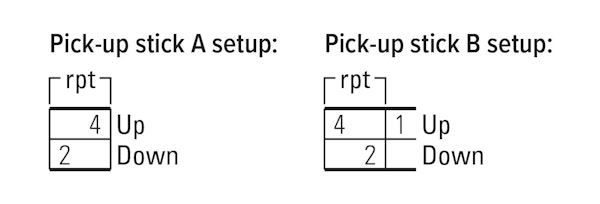
In this example pick-up stick draft where you are using two pick-up sticks, you’ll see instructions for each.
As you can see, this matches the written directions for pick-up stick B shown in that draft:

When using two pick-up sticks, you’ll also see written instructions for both in your draft.
When you are ready to weave, start at the top of the pattern sequence and follow the directions in each step. In this example draft, step 1 indicates “Up,” so you’d place the heddle in the up position and then weave that pick. Step 2 is “Pick-up stick A,” which you’d bring forward and tip up as needed to create your shed. Remember to move the pick-up stick to the back before you beat.
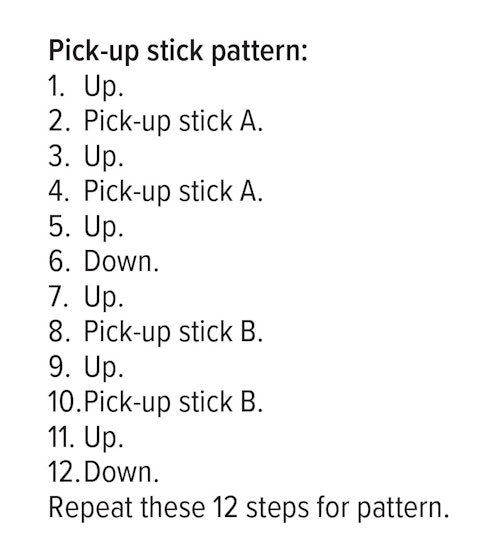
Once your pick-up sticks are set, you’ll begin weaving by following the pattern steps as shown in the draft.
As a final tip, if a step in your pattern has two components, for example, “Up and pick-up stick A,” always move the heddle first and then the pick-up stick.
So there you have it: the basics of reading pick-up charts and instructions. Give it a try and weave something wonderful!
Happy Weaving,
Christina