Contents
When I first began my foray into fiber arts, many years ago, I remember coming across the direction to “baste” two pieces together. At that point my only frame of reference for basting had to do with cooking. With the help of the internet I was able to determine that I needed to loosely sew the pieces together, not spoon pan drippings on them.
That moment of confusion stuck with me and to this day it informs how I edit Easy Weaving with Little Looms. It’s why at the back of every issue we have a whole page of finishes and seams and, more recently, a diagram with instructions on how to warp a rigid-heddle loom with two heddles. These resources are so useful, in fact, it seems like a good idea to put them on the website so everyone can access them. So without further ado, here’s a few of the most useful items you’ll find in the Easy Weaving with Little Looms Reader’s Guide.
Simple Hemstitch

Hemstitching is an on-loom technique that holds the weft in place with the bonus of being attractive. After weaving a scrap-yarn header, begin your project leaving a tail of weft four times the warp width hanging off the side. If you are right-handed, leave the tail on the right, and leave it on the left side if you are left-handed. Weave an inch of plain weave (or the basic weave structure of the piece). Thread the tail on a blunt tapestry needle. Pass the needle under a selected group of ends between the scrap yarn and your fabric. Bring it up and back to the starting point, encircling the ends. Pass the needle under the same group of ends, then angle the needle, bringing it up two (or more) picks into the fabric. Repeat for each group of ends across the warp. Needle-weave the tail into the selvedge and trim, or incorporate it into the edge bundle. If you are hemstitching at the end of a piece, leave a tail on your last pick and use it to hemstitch by encircling the same number of warp ends as you did at the beginning.
Backstitch

Backstitching provides stability to your seam by doubling back with every stitch. Before you start backstitching, it can help to do a loop-de-loop with your needle-holding hand in the air to get a feel for the movement. This is essentially what you’ll be doing with your thread. If you’re stitching from right to left, stitch as follows: Pull the needle completely through the fabric going from the bottom to the top. Reenter the top of the fabric to the right of the original entry point and pull the needle through the fabric. Position the needle so it will enter one stitch length to the left of the original entry point, pull it through, and continue in this manner for the rest of the seam from right to left.
Twisted Fringe

Twisting fringe keeps it from fraying and can make a piece look more “finished.” To create twisted fringe, divide the number of threads for each fringe into two groups. Twist each group clockwise, either by hand or with a fringe twister, until it kinks. Bring both groups together, secure the ends with an overhand knot, and let the fringe go. The groups will twist around each other counterclock-wise. You can use the same method to make a plied cord by attaching one end to a stationary object, folding the kinked cord in the middle, and bringing the two ends together.
Whipstitch and Double Overcast Joins
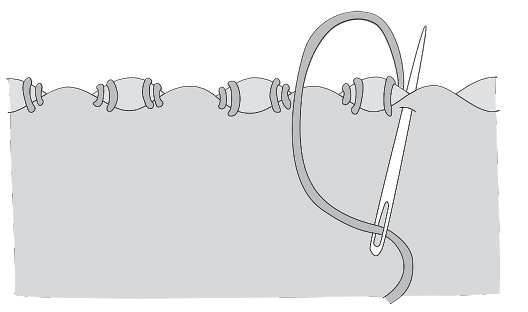
Whipstitch and double overcast are the two most common methods for joining pin-loom squares. The two methods are similar; double overcast is simply a doubled-up version of whipstitch. To stitch either of these seams, start by placing the two edges you want joined, right sides together. The loops will probably be staggered—this is good. Starting at one end on the bottom layer, pull your threaded tapestry needle up through the first pair of loops. If you’re doing whipstitch, move to the next pair of loops; for double overcast, repeat this move in the same pair of loops. Continue to the next pair of loops and bring the needle back through that pair from the bottom to the top; repeat until you reach the end. The double-overcast join is shown above. For whipstitch, wrap around each group of loops once instead of twice.
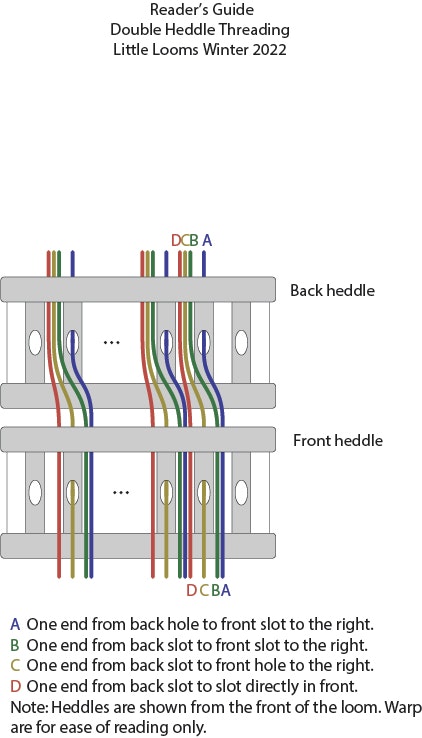
Warping with Two Heddles for Double Sett
Pick-up Stick Basics
Using pick-up sticks expands the range of patterns you can weave on your rigid-heddle loom by altering the plain-weave sheds. For patterned weaving with warp and weft floats, here’s how to create different types of sheds with pick-up sticks.
*Setting up a pick-up stick *
Put the heddle in the down position. Work behind the heddle, picking up the slot ends with the pick-up stick as indicated in the pick-up stick pattern. If you find picking up ends behind the heddle difficult, you can pick up the ends in front of the heddle and then transfer the pick-up pattern to another stick behind the heddle by placing the first stick on its edge and pushing it up close to the heddle to make the lifted ends more visible. Push the pick-up stick to the back of the loom when not in use. For “up” and “down” plain-weave sheds, weave normally with the pick-up stick pushed back.
*Pick-up stick *
Put the heddle in the neutral position. Turn the pick-up stick on its edge behind the heddle. This shed creates weft floats on the front and warp floats on the back. Up + pick-up stick Put the heddle in the up position. Bring the pick-up stick close to the heddle, keeping the stick flat in the warp. This shed creates warp floats on the front and weft floats on the back.
*Using multiple pick-up sticks *
Insert a second pick-up stick behind the heddle and in front of the first pick-up stick. Use the second pick-up stick to weave one or more picks. In some cases, you can leave both sticks in and that will be indicated in the pattern, but usually you will need to remove the second pick-up stick to resume weaving with the first.
Happy Weaving! Christina